


TELE RIVER
Note: This is a digital download. It includes a total of 20 files:
5 STL files of the guitar body in 5 sections
1 STL file of the pickup cover
1 STL file of the output jack cover
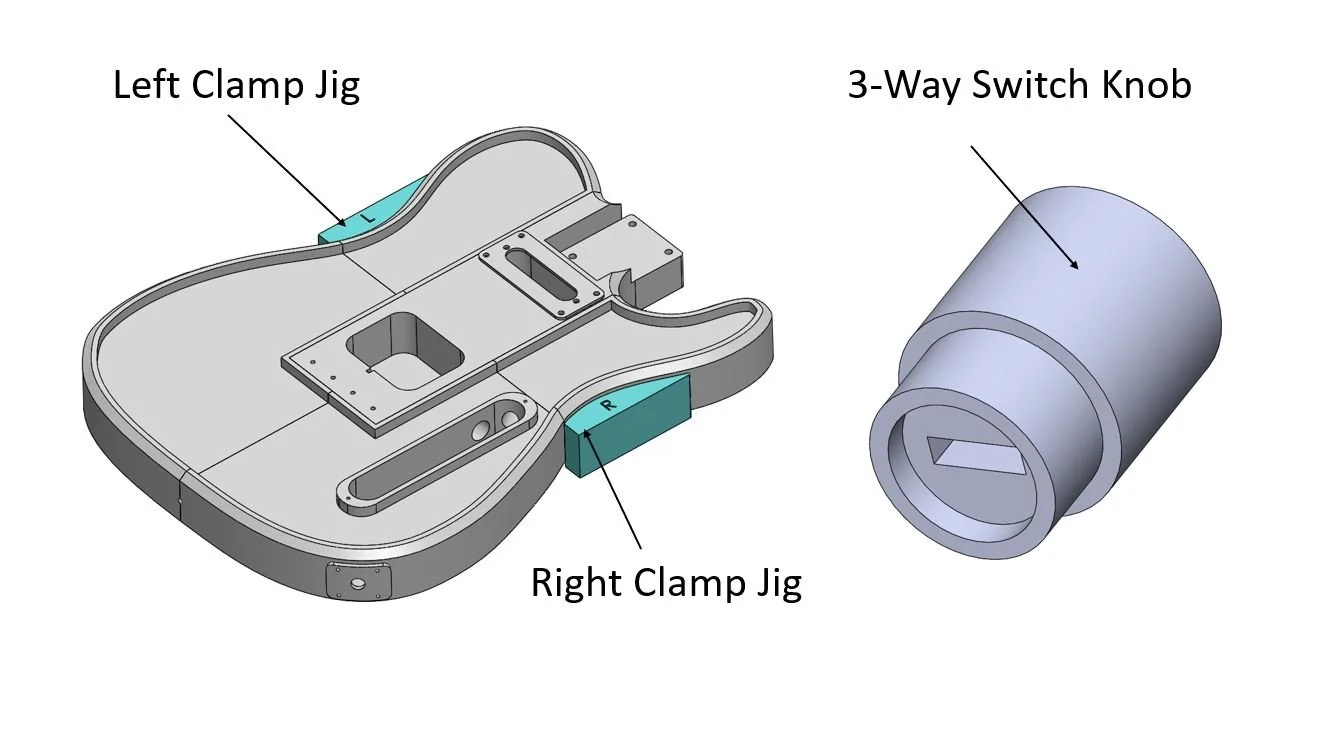
2 STL files of left and right clamp jigs
1 STL file of the 3-way switch knob
All STL files also come with a .3mf file (with slicer settings pre-loaded)
The colors shown are just example resin fills. You can fill the resin cavities with whatever colors you want to customize the design and make it your own!
Creative Commons: No commercial use, public sharing, distribution, sale, donation or exchange of the digital files
Check out the project details below for more information on how to build the guitar!
Project Details
Hi everybody and welcome to The 3D Print Zone. So several years back I had this idea to combine two of my hobbies, 3D printing and guitar!
I think being able to turn rolls of plastic into functional parts and designs is the core of what makes 3D printing such a powerful tool. And while finding ways to use 3D printers to make functional parts and designs can be more challenging, I think it is way more fun and rewarding in the end.
This is a fun and challenging project and I hope you enjoy the build as much as I did! Check out the build and a demo of the guitar playing here:
☑️ Project Materials ☑️
Affiliate Disclosure: Commissions may be earned on some of the links provided. It won't cost you extra, but will help support the channel!
Epoxy
Mica Powder
Electronics
Pickups
Bridge
Neck
Tuning Pegs
Neck Plate
Strings
Dowels
PVC Cement
Super Glue
☑️ 3D Printing ☑️
To print the body of the guitar I split the model into 5 sections so it could be printed on a vast majority of home 3D printers. In my case, I’m printing on a Bambu Lab A1 which has a build area of 256 by 256 mm.

I used Bambu Studio to slice the models and printed all of the main body parts using Bambu Lab White PLA Basic. For the jack cover and pickup cover I went with a silk purple color to match the epoxy.
It’s very important that the inner core piece that mounts the pickups and bridge is very strong in order to withstand the tension of the guitar strings and therefore I used the built in “Strength” profile for the core and an infill percentage of 40. I also increased the number of perimeter wall loops to 6 to give it extra strength.
Since the outer pieces do not see any significant load, I printed them using the “Standard” profile with 25% infill and the default 2 perimeter wall loops. That being said, you can can increase any of the infill percentages if you are looking for a stronger or heavier guitar body.
All parts were printed with 0.2mm layer heights, and tree supports were used for overhangs. The smaller jack cover and pickup cover were both printed with 100% infill. To make things easier for you, I’ve included the 3MF files in the download, which includes all the print settings automatically pre-loaded, although you can still adjust them If you want.
This table summarizes the print time and amount of filament used for each part.

If you use the same settings you can expect to use about 1.8 kgs of filament, or just under 2 standard rolls, and have a total print time of around 35 hours. If you assume an average roll of filament cost around $20, then the entire guitar body will cost you approximately $36 to print.
☑️ Body Assembly ☑️
The guitar body is designed to go together using wooden dowel pins that are 10mm in diameter and 50mm long. That being said, you could also use 3D printed dowels if you prefer. The dowel pins are used to align the parts during assembly and they also provide some stiffness to the body.
On the Les Paul design I used PVC cement and super glue to hold the parts together, and this worked well so I used the same technique here. I used a paint brush to coat both the dowel rods and plastic contact faces with cement and then pushed the parts together.
I then used wood clamps to tightly squeeze and hold the parts together to get a strong bond. After gluing everything together I waited 24 hours to let it fully set.

☑️ Resin Pour ☑️
The next step in the build is definitely my favorite. Similar to the Les Paul design, I decided to give the guitar a unique aesthetic by using resin for the top surface. Recently I’ve been experimenting with 3D printed parts and resin and I really like the design possibilities it unlocks. For a 3D printed guitar body it provides a cool look, added stiffness, and helps to achieve a better weight.
I previously learned that resin can easily seep between the seams of the body, so I used a liquid super glue to seal the gaps between the parts. Prior to actually pouring the epoxy you want to make sure your work surface is as level as possible, as this is critical to ensuring the resin is flat when it cures. I chose a 2-part epoxy made by JB Weld which is a great option because it’s both clear and rock-solid when it fully cures.
I used the CAD model to calculate the volume of resin needed and determined that the guitar required about ~517,000 cubic mm of resin which converts to a little more than 500 mL of epoxy. Therefore, I used about 270 mL of Part A and 270 mL of Part B to ensure I had enough material with a little extra just in case.
I used Black Diamond Mica powder to give the resin a sparkle-y colorful look to it, choosing Purple Haze as the main color, with a bit of Silver Pearl, Deep Blue Sea, and Pure Pearl White to give it some additional texture and color dynamic. That being said, you can of course use any color mixture you want here depending on the look you’re going for.
I chose to mix all the mica powder in the Part A resin and made sure to mix the powder really well so that it was uniformly distributed. After adding Part B I thoroughly mixed it all together to ensure the epoxy would cure properly. I don’t know about you, but personally I think pouring the resin into the body cavity is super satisfying.

The resin step is an opportunity to add your own creativity and really change the overall aesthetic of the design, and for this guitar I decided to give it a bit of a textured look by using a wooden stick to create a swirl pattern. There’s really no right or wrong here, I was mainly just going for a semi-random look and overall I am really happy with how it turned out.
☑️ Neck & Electronics ☑️
For the neck of the guitar I am using a Fender Squier Telecaster neck that I took from an old guitar I had laying around. It has a width of about 55mm and a height of approximately 24mm. The neck gets mounted to the body using a neck plate with 4 screws that go through clearance holes in the 3D print and screw directly into the wood.
Now it's time to install the electronics, starting with a 24 gauge ground wire for the bridge. I fed the wire through the hole to the electronics compartment and taped it to the body using gorilla tape to hold it in place. The bridge will clamp down on it to provide a path to ground.
I’m using pickups that I purchased on Amazon with some extension wires to make the connections easier. After feeding the wires through the hole I fastened the bridge to the body with 4 screws. Next I installed the neck pickup mounting plate to the pickup using the included screws and springs and then mounted the assembly to the guitar body.
Since soldering is not my area of expertise, I decided make my life easier and chose to use an ObsidianWire solderless telecaster electronics kit that has a pre-wired control plate. Essentially all you have to do it push down tabs on a connector and insert the wires to make the connections. Ill provide a link below.

The kit comes with the necessary hardware as well as an output jack that I mounted to the 3D printed mount. After feeding the wires through the body I mounted the jack assembly to the body using 4 small screws. I’m using Ernie Ball Regular Slinky strings, but you can of course use any strings you prefer.
I am not going to walk through the entire process of stringing a guitar and setting it up, but there are plenty of tutorials online for those who have never done it before.
For the guitar strap posts I’m using parts from Musiclily that I bought on Amazon. To fasten them to the guitar I am using M4 x 20 flat head machine screws and square nuts. After installing the small rubber washer, simply insert the square nuts into the slots in the body and fasten the strap posts into position.
The ObsidianWire electronics module is then mounted to an electronics plate by feeding the potentiometer dials through and fastening them with nuts and the 3 way-switch mounts to the plate using 2 screws. Lastly, it’s time to make the wire connections. This step is fairly straightforward, you simply just follow the included wire diagram which shows which wire goes where.
The instructions recommend 6mm of exposed wire for a proper connection and then you simply press the tab down, insert the wire, and release. Now we just mount the electronics assembly to the body using 2 screws and the build is officially complete.

I am really happy with how the guitar came out in the end and I hope you will enjoy the build as much as I did!